
Tie dyeing, a popular fabric trend from the ’60s, symbolized free expression and the carefree hippie era. This technique periodically makes a comeback, always retaining its iconic free-spirited individuality through its unique designs. Today, celebrities wear tie dye, proving it never truly goes out of style. Keep reading to discover how to tie dye step by step with this easy guide for beginners.
How to Tie Dye Step by Step
Learning how to tie dye is a bit messy but incredibly fun, and it’s an activity the whole family can enjoy. The end result is always unique, with no right or wrong outcome. Once you have the right materials, the process is straightforward. It involves tying up different parts of the fabric so the dye penetrates unevenly, creating various effects based on the tying technique used. You can even combine tie dye with fabric paint and other mediums to craft one-of-a-kind pieces for your wardrobe. While bright colors are often associated with tie dye, you can use pastels, earthy tones, or any colors you like. Follow these simple directions to start your tie dye project.
What Do You Need to Learn How to Tie Dye Step by Step?
- Workspace: Set up your dye station in an indoor or outdoor space where spills and messes are easy to manage. Keep paper towels handy for quick cleanups.
- Dye: Use commercial tie-dye colors for the best results. For smaller projects, consider tie-dye kits that come with several colors in smaller quantities. These kits often include applicator bottles pre-filled with powder dye—just add water.
- Fabric: Choose items made of 100% cotton, rayon, or natural fibers like silk for the best results. You can experiment with fabric blends, but they may not absorb the dye as well. Most dye packets provide enough color for several items, so gather a few pieces to dye together, using the same colors but creating different patterns on each.
- Buckets: Use buckets or plastic containers to hold enough dye for dipping your items. Plan on having one bucket for each color you mix.
- Water: You’ll need a hose or a stainless steel sink to rinse items in cold water. Avoid plastic sinks, as they may stain.
- Stirrers: Use wooden spoons or dowel rods to stir the fabrics. These will stain from the dye, so use something disposable.
- Bands: Rubber bands or twine are essential for tying the fabric. Rubber bands are preferred as they prevent the dye from penetrating, leaving white bands in your final product.
- Gloves: Wear rubber gloves to keep your hands from getting stained.
- Marbles: Marbles are great for wrapping into the fabric and tying for unique patterns.
- Tools: Have scissors and metal tongs on hand for various tasks.
What Dye Should You Use for Tie Dye?
- ONE STEP DYES: When folks ask about this, they usually want the easiest option. One-step dyes are often the simplest choice since you just need to add water to activate them.
Tulip is a standout brand for vibrant one-step dyes crafted especially for tie-dyeing. These kits offer multiple colors and come with applicator bottles, which makes the whole process even easier. I also came across a beginner-friendly tie-dye kit at Kmart for just $9, which includes three colors—perfect for starting out.
- OTHER TIE DYES: Other brands offer dyes that work well for tie-dyeing, though some may need you to pre-wash your fabric in soda ash before dyeing. Since pre-washing is necessary anyway, this step isn’t much trouble. All-purpose fabric dyes can also be used for tie-dyeing, but they often produce lighter colors that may not hold up as well over time.
Instructions
Here’s a concise summary of the tie dye process:
- Set up your workspace with dye and fabric ready.
- Tie the fabric into knots or desired patterns.
- Immerse the fabric in dye.
- Rinse the dyed fabric thoroughly.
- Repeat for additional colors or patterns.
- Allow the item to dry completely.
Step 1 - Getting Ready: Mixing Dye and Washing Fabric
- Get Your Workspace Ready: Prepare your chosen area for a creative and potentially messy activity. Cover tables with plastic and, if necessary, consider protecting the floor as well. Working outdoors offers more space and freedom, making it perfect for involving the whole family.
- Mix the Dye: Follow the instructions on the dye packet to prepare the dye mixture. One-step dyes like those from Tulip typically only require adding water to the applicator bottles. For larger dye packets, use buckets or containers to mix and store the dye.
- Prepare the Fabric: Get your fabric ready accordingly. New clothing items should be washed beforehand to remove any starch or chemicals that could hinder dye absorption. Fabrics or garments you plan to upcycle do not need washing but should be dampened before dyeing.
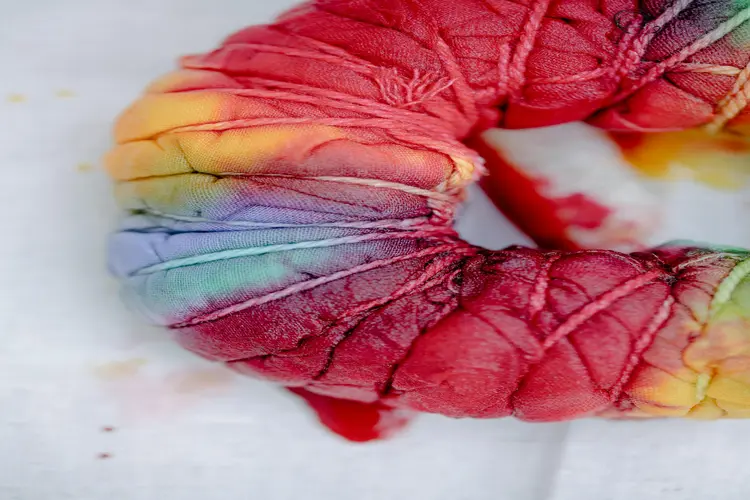
Step 2 - Tie up the Shirts
Once your workspace is ready, you can dive into creating your tie-dye design. There are many methods and color combinations to experiment with, so it’s wise to start with a straightforward approach.
Choose your tying technique: rubber bands are versatile and easy to use, or you can use twine if you prefer. The key to tie-dye is tying sections with bands or strings to resist the dye, forming unique patterns and swirls. Applying candle wax to the twine can increase its resistance to dye absorption, enhancing the design’s intricacy.

Step 3 - Dip into the Dye
Once you’ve tied up the fabric, get ready to swirl it in the dye bucket. Use tongs to lift it and check the color intensity. If it’s not as vibrant as you’d like, leave the fabric in the dye longer. Follow the dye packet for recommended soaking times and water ratios.
After dyeing, wrap the damp fabric in a plastic bag to let the colors set. Follow the instructions on the dye packet for the suggested setting time.

Using an applicator or brush
For precise color application, use plastic applicator bottles to apply dye exactly where you want it. Alternatively, mix different colors in bowls and use a brush for detailed application. Quickly absorb any excess dye with paper towels.
To prevent the fabric from absorbing too much dye, place it on a cooking rack. This method enhances color definition. I placed my rack on a large glass oven dish for easy cleanup.
After applying dye with an applicator or brush, place the item in a plastic bag to let the dye set. The duration depends on how vibrant you want the colors to be. Most one-step dyes suggest 6-8 hours, but you can leave it longer for even brighter hues.
Step 4 - Rinse
Once you’re happy with the color, take the item out of the plastic bag and rinse it thoroughly in cold water. Continue rinsing until the water runs clear.
Step 5 - Optional: Repeat the Process for Additional Colors
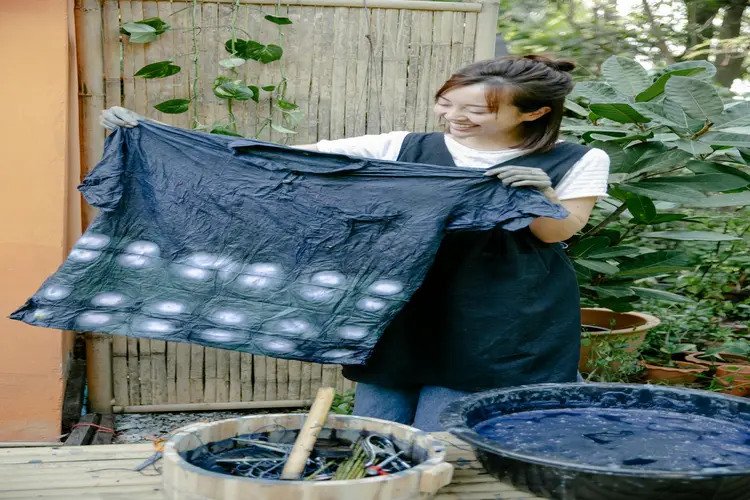
If you plan to use different or overlapping colors, repeat the dyeing process for each color carefully. Using multiple colors requires careful consideration because they can mix and change when dyed together. For example, dyeing yellow over blue will create a green hue. If you unwrap and re-tie the fabric before applying the next color, the white areas will take on the new color, while the previously dyed sections blend according to color mixing principles.
Step 6 - Remove Bands, Wash, and Dry
Once the rinsing is complete and the water runs clear, remove the rubber bands. Wash the dyed fabric items by hand or machine in a regular cycle. Since there may still be residual dye, it’s crucial to wash the fabric separately.
After washing, hang the fabric to air dry and then give it a thorough ironing if needed.
You may also like:
- The History Of Sewing Machine
- Using a Seam Ripper: A Step-by-Step Guide
- Different Types of Sewing Machines
- Guide To Sewing Machine Needles Size, Types, And Uses
- Sewing Machine Parts And Functions
- Count of Yarn: Explanation and Varieties
- Yarn Manufacturing Process
- Varieties of Woven Fabrics and Their Applications
- Non Woven Geotextile Fabric
- What is Sisal Fiber? Properties, Structure, and How It Made?
Share this Article!